Tuesday, November 29, 2016

Heath Fabrication


Sick amount of work ... so much more to come … tho’ air nailers make things more pleasant. Except $20 made-in-china cheapo crown stapler … hissing/leaking after *one* rail of staples. Painful reminder buying cr*p quality tools is nearly always a bad idea.

The curved parts for the Hearth base mold “buck” were cut on my Craftsman Professional 14” band saw ($100. craigslist deal a few years ago J) . Bought/assembled a Harbor Freight mobile base to muscle it around...feels like the saw outweighs me by 100 lbs, tho' spec says it's 160 lbs.

Friday after Thanksgiving was 4+ hour road trip to Globe Marble  ($450. for 7 bags of Surecrete GFRC premix, catalyst, and mold release) then up to Yonkers for yet-another-craigslist-deal (4 gallons of polyurethane molding rubber for $200, ~half-price). Was gonna try to get away with buying only a gallon of the polyurethane rubber, tho’ likely would've had to buy more. 

My original estimate to complete mantel was $500 … probably more like $1k when all is said and done. Store-bought cast stone mantels similar to my design start at ~ $3k (for both sides) though that *would not include* the top, side, or hearth.


Thursday, November 10, 2016

'Nother Minor Update

Pic of the kitchen-facing side, work-in-progess:


...and (almost) completed mockup of 'bolection' style surround:


Monday, October 31, 2016

Minor Update

Completed framing & durock for the hearth (base). Cement board is tough (tiring!) to cut - even with the carbide razor knife. Much easier with 4-inch grinder + diamond blade (e.g. curved piece) tho’ kicks up *crazy* amount of really-bad-for-you-dust (outside, of course J)


Will ‘cast in place’ hearth in one piece (ala concrete counter top), with rope edge detail
(pic of ‘edge insert’ for the mold form] :


Thursday, October 27, 2016

Progress ... or something like it

Finally ... finally ... finally


It's been about a month or so, took about that long for my brain to cool off from the off-the-hook silliness (I'm self-censoring, if you can't tell) involved with getting the gas service turned on.

Suffice to say it took FOUR appointments (and consumed THREE half-vacation days) to finally have the gas service turned on.  One of the appointments was pretty funny, in retrospect: I actually started to run down the street after the National Grid truck, but didn't think it was worth an aneurism (considering how out of shape I'm in). Once I found out about ANOTHER form that had to be completed (proof of service line buried to spec), dropped it off for the plumber to complete (don't even ask if he should have known about the form), had the plumber come back to add an "isolation union" required by the Gas company, by the time the FOURTH service call happened, it took all of about twenty minutes for the technician to install the meter and test fire the fireplace (for the first time...hooray!).

Oh and I forgot to mention the Propane-to-Natural Gas conversion escapades: back and forth with the online company I bought the fireplace (and LP/NG conversion kit, remote, blower, and vent kit) from, to try to get them to send me the _corrrect_ pilot orifice for NG. I comprehensively documented the issue (pictures, scanned pics of installation guides, etc), probably a dozen emails back and forth, was shipped incorrect additional parts (and _another_ complete conversion kits, but could not get them to send me the correct five-dollar pilot orifice.  I finally gave up, and ordered the NG pilot orifice from a different online fireplace parts company, including shipping cost $13 (I grit my teeth a little ...yet more dental work needed). Finally found a local 'FMI'- certified fireplace installer willing to do the conversion - though I hadn't bought the fireplace from them - and they completed setting up the fireplace (install blower, remote, etc). $250. for the service call, money well spent, I think ... would have taken me _much_much_ longer.  I won't hold it against them that one of the wires came off because the crimped connection interfered with the louvered access panel when it opened ... easy enough fix, though a minute or three anxiety when the fireplace wouldn't start back up immediately.

So ... two years later :-o we _finally_ have a working fireplace. Way cool to push a button on the remote, and it  fires right up.  With the thermostatically controlled blower on, it throws off quite a bit of heat ... but still too early in the season to know how much a difference it'll make it the heart of the winter.

I'm now focused on design and fabrication of the fireplace hearth(s), mantel(s) and surround(s) ... one for each room :-).  I'm still planning to build everything from GFRC (glass fiber reinforced concrete), with a minor segue way thinking about casting everything in fiberglass refinforced gypsum (GFRG) ... but I'm back to doing it all in GFRC.  Pretty complex design: wrap-around hearth (with rope-edge detail), 'bolection' molding surround for the Kitchen-facing side, and 'Acanthus Leaf Corbel' on each side of the fireplace, facing the Den. The top will have crown molding around the perimeter, with a curved side facing the Den.  I'll scan and post a few sketches I've done.  Stay tuned...

Friday, June 10, 2016

Fellowship of the Fireplace of the Return of the King of the Hebrew Handymen

Our three bedroom neo-colonial was built in 1950 as a 'Levittown Ranch':  two bedroom cape, on a concrete slab, detached garage. The original foundation has slab heating (i.e., one zone consists of copper pipes embedded in the slab), which leak in various places. In 1969, the previous owner added a second story.  It's not clear if the single-store extensions to the kitchen and den were added at the same time as the second story - though both extensions are also on concrete slabs, albeit without slab heating. The combined effect of the slab foundation, and north-facing kitchen and den extensions result in the first floor being essentially uninhabitable in the bitter winder months (Jan/Feb).  If we turn on the two heating zones on the first floor full blast, it eventually warms up, but the boiler runs without pause (i.e. we can watch the heating bill tick up by the second). So, when winter sets in, we become second floor hermits, other than coming downstairs for breakfast. Dinners almost without exception are upstairs, in bed, using a towel as a "placemat".

With various run-ups in heating oil over the years, we looked into getting natural gas, but running a line to our house wasn't financially viable.  A few years ago, three houses on our left (original two bedroom capes) became "knockdown" McMansion spec houses, and gas service was now available to us (not that anyone asked!).

A few winters ago was really miserable - much colder than usual, and I (we ?) decided it made sense to get a gas fireplace for the first floor, which we (I ?) hoped would enable enjoying the space (den, TV room, dinners, etc), and maybe even entertaining more during the cold season.

This coincided with repeated occurrences of flooding in the back of the house, primarily the den extension - resulting from the the backyard sloping toward the house, and repeated failed attempts at drainage.  The drainage system(s) would work OK most of the time, but then a torrential storm came, and we'd have another ruined carpet, or laminate floor in the den.   Multiple attempts to shop vacuum water out of the carpeting, then shampoo machine, didn't help.  Tearing up the water-logged carpeting from the last flooding, we decided the next flooring in the den would be tile - much easier to deal with, in the likely event of future flooding.

In addition to the flooding problem, the north facing kitchen extension roof was very low pitched, and recurring ice dams resulted in replacing the entire roof system (~1992) including joists - yet ice dams continued to be a problem, with resulting roofing rot, and leaks, and significant water damage/mold in one corner of the kitchen.

Overall scope of the project:
  • dealing with the (massive) roof leaks.
  • install new floor
  • install gas service line from gas meter (side of the house) to the location of the fireplace (particularly challenging due to concrete slab).
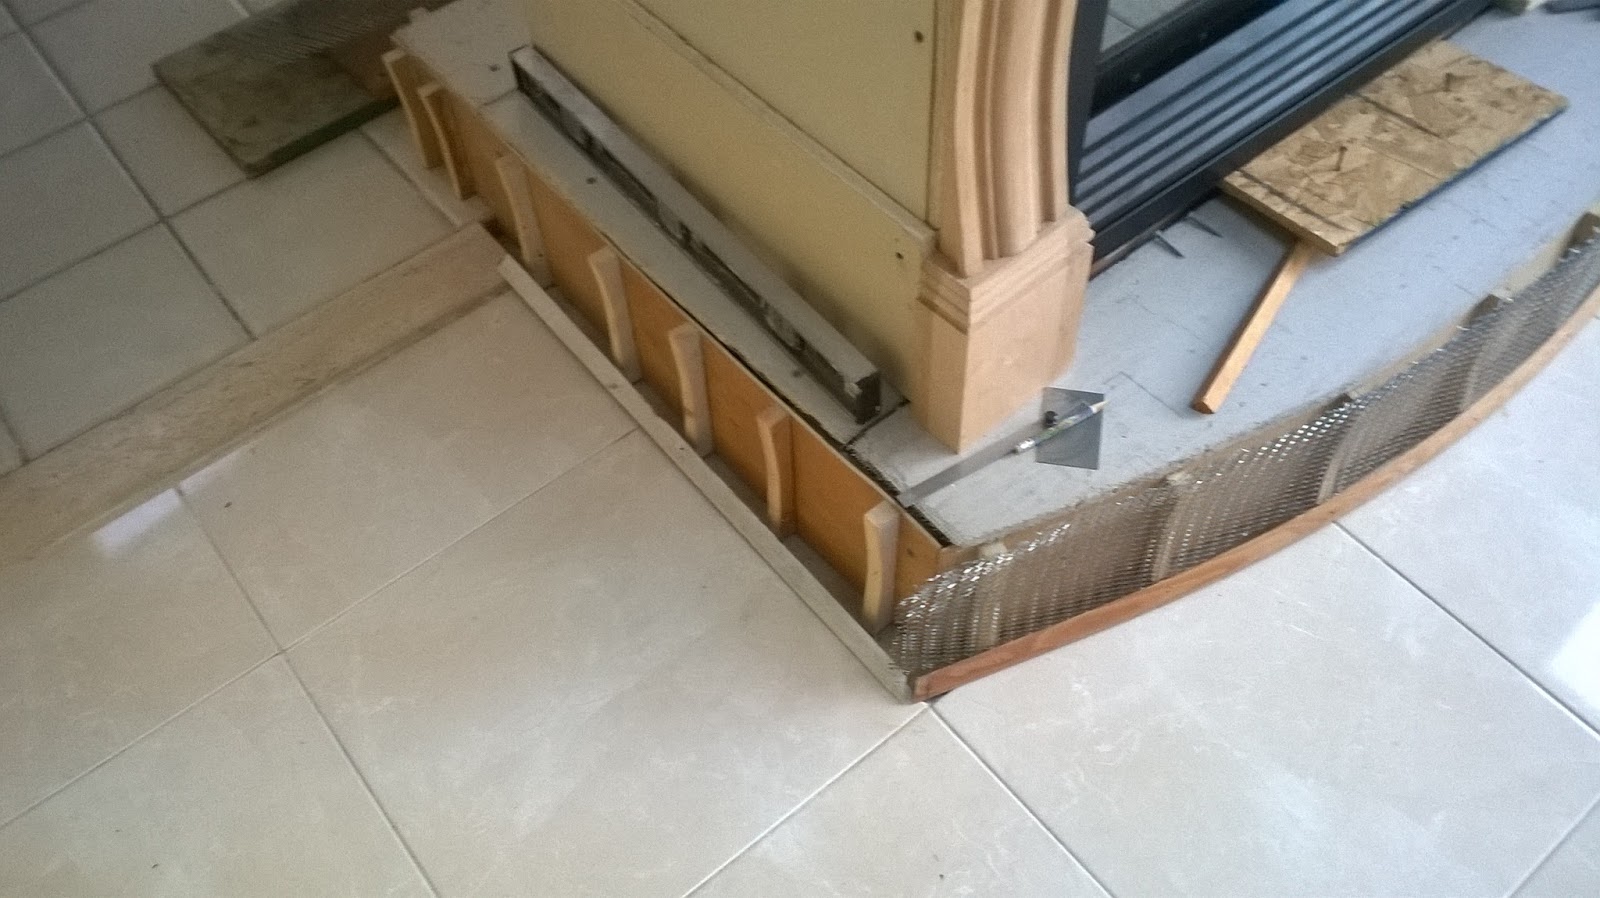
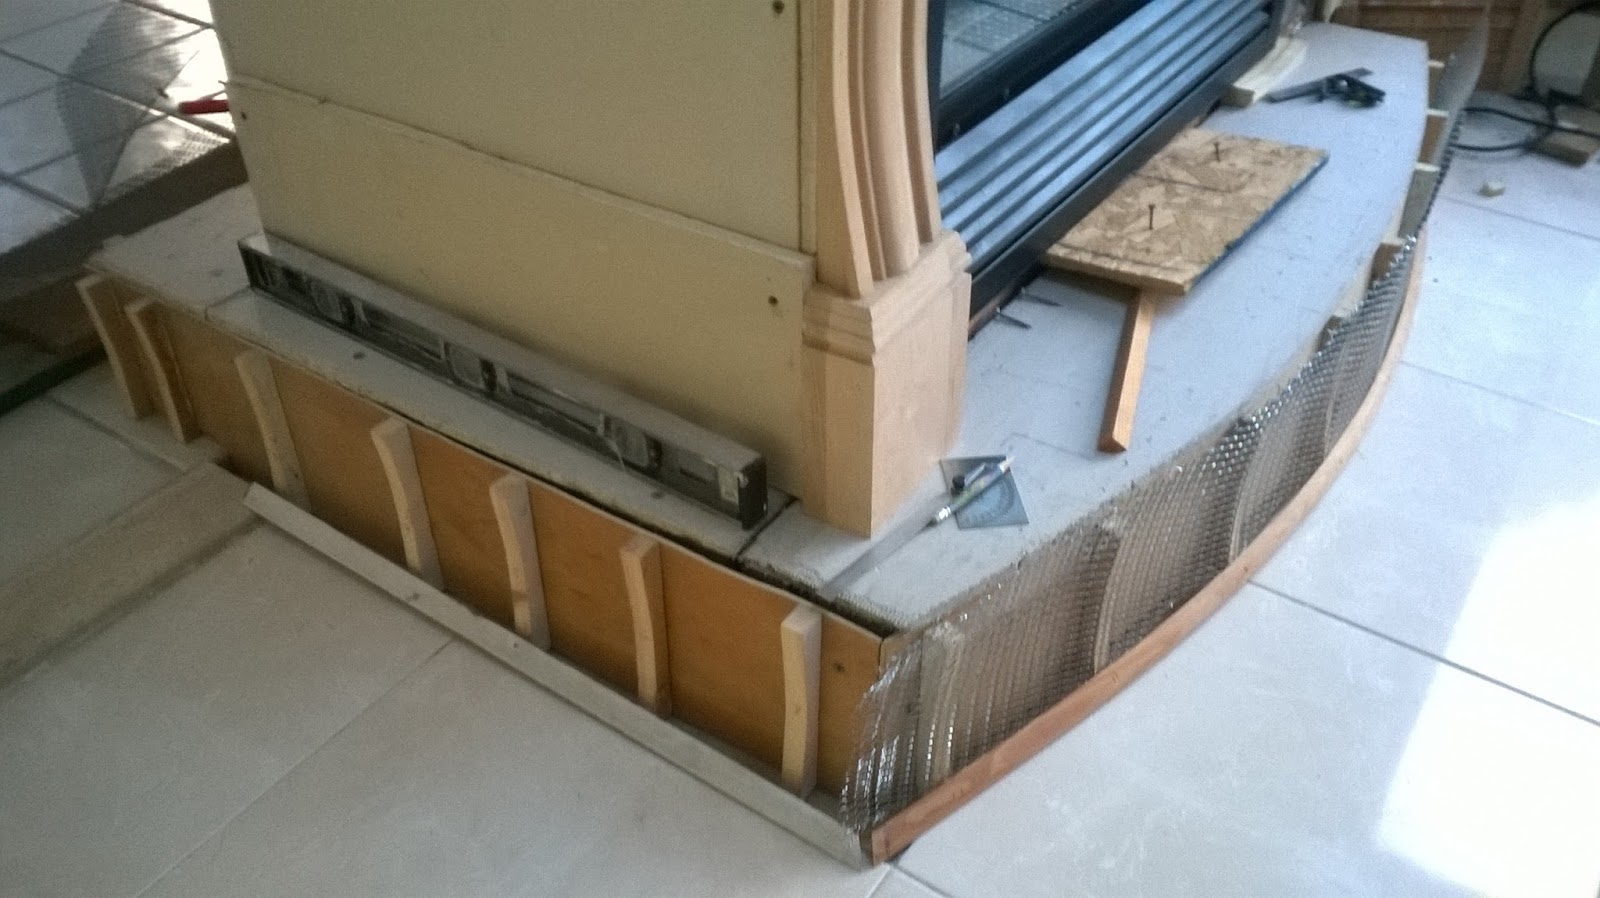
  • construction of fireplace platform, venting, electrical, drywall, wallpaper, etc etc etc.
  • two mantel surrounds (see through fireplace, as shown in the pic) and hearth.
This project has become my "white whale": I'd promised Amy it would be ready to use the winter of 2014/15 (this is being written June 2016).  The fireplace unit was purchased October 2014, and demolition of the den closet (location of the fireplace to be installed) began that Thanksgiving. At this point, an incredible amount of work has been completed.

Pic taken after Thanksgiving 2014: demolition, installation of new header, rough framing for
fireplace venting and platform, and electrical.


Pending items:
  • Building permit.
  • Fabricate & install mantel(s) and surround(s) - 'see-through fireplace', so two of these
    are needed, and I'm doing different design on each side ... just to make it more interesting :-) 
  • Set up the fireplace itself, including converting the propane unit purchased to natural gas,  install ceramics log set, remote control, and auxiliary fan. I'll probably hire a professional fireplace guy for this - tho' I'm confident I could do it myself ... would just take me muuuuuchhh longer!
So - much closer to the end than the beginning - but at this point, ~ 18 months (and counting) later than committed to my "better half".

Along the way I lined up estimates for the roof and flooring - yet decided to do the work myself. I'm reasonably certain these decisions were not always in the best interest of marital harmony - yet the outcome of virtually all the work I've done has been, as I call it, a "pro job"  (though these days, that doesn't always mean that much...)
.
I'll follow and post pics of the sub-projects

  Den Floor - winter 2015  (some pics previously posted)

   18 inch porcelain tiles were installed with 'medium set' mortar ( *crazy* hard to mix ),
   an effective solution for the sloping floor (about an inch difference in height) - this type
   of mortar can be installed up to an inch thick.

   Removed ~200 square feet of existing mastic (black-tar-adhesive ... essentially sticky
   kryptonite!) from the concrete floor using a 7-inch disc grinder and specialized diamond
   -encrusted tool 'Diamabrush'  and DIY dust shroud made from a two gallon plastic bucket
   and PVC shower drain.

  Roof - summer 2015
  • Removed existing roof, had *four* layers of shingles  (building code permits up to three!)
  • Installed fireplace venting (vertical vent, through the roof).
  • Reworked valley, installed ice/water shield membrane ...had to do this twice :-(
  • 45x45 skylight had to be removed, disassembled, damaged copper flashing repaired
    (nail holes where they weren't supposed to be) and reinstalled. *Crazy* heavy to move
    by myself.
  Interior remodeling - Thanksgiving 2015
  • Drywall, paint, wallpaper
  • Electrical
  Gas Meter installed by National Grid -  2015

  Building Permit Applications  - Spring 2016
  • Drawings by yours-truly, and stamped by PE  (thanks again, Ryan!)
  • Plumbing permit (completed), construction permit (pending)
Pic of one of the permit application drawings (can you tell I took three years of drafting classes in Jr./Sr. High School ?):


  Gas Service Line, from Meter to Fireplace - Spring 2016  (pics previously posted)

Wednesday, May 25, 2016

Adventures in Ditch Digging


Lots & lots of project pics to share (and will eventually post)... here is my latest exercise in trace-elements-of-testosterone (age 59, no less) and yet-another-sub project-along-the-sisyphean-fireplace-adventure - coming up on two years :-(

In my ongoing quest to save $5 while spending countless beautiful weekends covered in grime (and other unpleasantness!) I decided to route the gas line for the fireplace underneath the patio, roughly 20 feet or so from the gas meter, to the exterior wall adjacent to the fireplace. The alternative (proposed by various plumbers) was to route the gas line through the open soffit in the den (already contains dryer vent, oil fuel line, and a few electrical cables), then through/across the ceiling, down to the fireplace. Rather than spend a few extra hundred for the plumber to do it, I decided it would be (a) more manly, (b) save money, and (c) avoid limiting future internal renovation by the following DIY 'fun':

1. Take up pavers from 20' x 2' section of the patio;
2. Dig up & remove the drainage system ( two 12" square drainage pots connected by a
    4" french drain, routed around the side to an underground drainage pipe running to the front
    of the house );
3. Excavate a 24 inch deep trench for the new gas line;
4. Buy 12 60-lb bags of sand;
5. After the plumber installed the new gas line, back-fill trench with the sand to cover the line;
6. Back-fill trench with soil removed in step # 3, removing several buckets worth of rocks
    by hand, along the way ... turns out that having rocks in gas line trenches is a bad thing ... who
    knew ? This step included reinstalling the two drainage pots and french drain pipe.
    Shovel, remove stones, tamp dirt, repeat...
7. Reassemble paver-puzzle;
8. I still have to button-up the two drainage pots, but (as a colleague described it) "serviceable"
    enough for upcoming Memorial Day weekend BBQ!

The Israeli plumber (!) was amused by the overfed middle aged ditch digger, and acknowledged the trench was fine for his purposes.

BTW, this is the _third_ time I've had to dig up (and then repair) this section of the patio...I really hope it's the last...

Best of all: stamped/approved Town of Oyster plumbing permit came in the mail a week after the inspection :-)